Quick Coconut Flour Flatbread

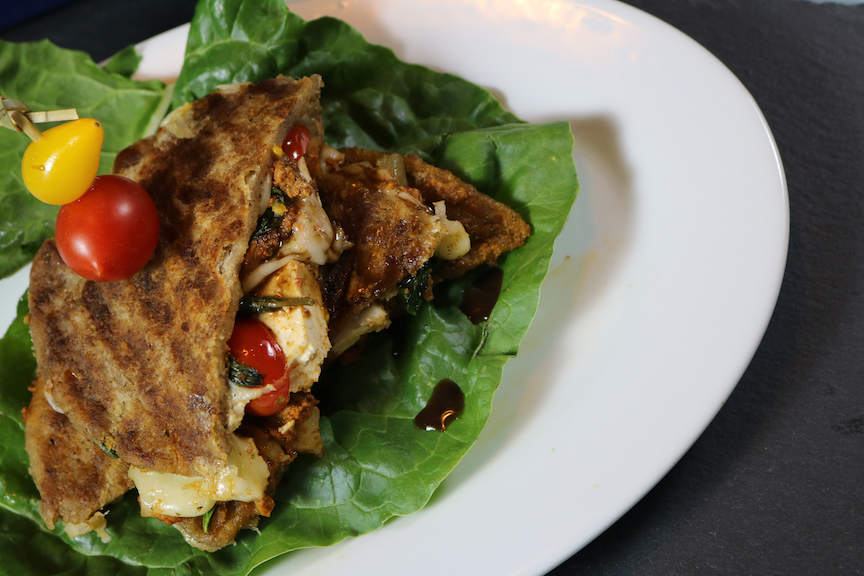
This is a Vegan & Paleo 1-bowl, 1-spoon recipe that takes mere minutes to make! With all the benefits that coconut brings to your plate, plus hormone boosting with a blast of maca, who could ask for more from your sandwich? Freestyle with this adaptogenic bread, as it will make a grilled Panini sandwich (facing page) as easily as a flatbread appetizer for unexpected guests. Recipe yields 4-6 flatbreads.

Gather Up

½ tsp Garlic Granules

⅛ tsp Black Pepper

⅛ tsp Sea Salt

1 cup (250ml) Water, boiling

½ cup (65g) Coconut Flour

2 TB Psyllium Husk Powder

¼ cup (60g) Coconut Oil, melted

2 tsp Fresh Rosemary Leaves, minced (no stems)

Jing It Up

1 tsp Maca Powder

1 tsp MCT Oil

Sling It Up

Put all the dry ingredients into a bowl. Stir with a spoon until it is well mixed. Add the melted coconut oil into the mixture and stir in the boiling water as you pour it in. Once mixed and cool enough to handle (just a few seconds), hand roll into a ball, then split the ball into four or six equal pieces.

On a piece of parchment paper, individually flatten each quarter into a flat disk, either by hand, or with a rolling pin and a second piece of parchment paper, so that the disk is about ⅛  inch thick. Using our hands is our method.

Use your favorite skillet, or crepe pan. You can use no oil or you can very lightly spray/oil with either ghee or coconut oil. Put the pan on medium heat. Drop the disks into the pan one at a time, cook until it is lightly browned on one side, then flip and lightly brown on the opposite side. A super thin spatula makes it easy to flip.

This flatbread is both flavorful and flexible and can be made in a hot pan with NO oil, but you need to watch it like a hawk so it does not burn or stick, as without the oil it can do both quickly!

Flatbreads will stay fresh in the refrigerator in a sealed container/bag for 3-5 days. They freeze beautifully up to 30 days. Can be made into pizza, sandwiches, panini, gyros, pita, etc.


JingSlinger Chia Vegan Egg Replacement

When you Google “Vegan Egg Replacement” and everything from applesauce to flax eggs pop up, what’s a chef to do? After testing hundreds of recipes designed for our discerning Vegan clients, the popular “1 tablespoon chia seed to 3 tablespoons of water” falls short for both taste and chemistry… it works okay, but it is not stellar. Our science geekitude is showing again, so hang with us this is a good thing!

First objective, how does it behave in the texture of your muffin/cake? Second objective, how does it behave in your body? We prefer chia to flax first because it packs more protein like an egg would and chia is not über estrogenic, so it doesn’t jack with your hormones. Chia seeds do not go rancid with the same quickness that flax tends to, and trust us, you don’t want rancid oils in your blood stream! Our JingSlinger Chia Egg is based on the culinary chemistry one large chicken egg brings to the table in baking for both flavor and texture.

Gather Up


1 TB freshly ground Chia Seed, measured after the grinding…
über important detail (there is the protein profile we want)
4 TB warm Water
1 tsp Coconut Oil (for the healthy fat component)

Sling It Up

Pour the 4 tablespoons of water and the 1 teaspoon of oil into a small bowl. Grind the chia seeds in your coffee or spice grinder, or powderize old-school style with a mortar and pestle, until you get a fine powder. Measure the 1 level tablespoon of the now ground chia into the water, a little at a time while whisking briskly to avoid clumps. Let it do its gel thing either on the counter top or in the fridge. When you measure it into a recipe, it will be 4 level tablespoons of the now gelled chia egg mixture for each egg called for in the recipe.

So one large egg equals = 4 tablespoons of a JingSlinger Chia Egg.
One cup of eggs equals = 4 JingSlinger Chia Eggs.

Note that a chia egg does not provide much or any rise or lift but it does allow the batter to come together and the protein aspect keeps it together. This egg does not whip into meringue or work in Pâte À Choux recipes. Chia eggs do impart a slight nutty flavor not so noticeable in chocolate or spice cake type recipes but in vanilla you may detect it. For lift and rise and a fluffy or more tender cake, muffin or cupcake you gotta deploy the special alchemical forces of lemon juice, apple cider or white vinegar with baking soda and or aluminum-free, non-GMO baking powder.

GlowTatoes

Cauliflower makes this mash a winner, no nightshade aches from these taters! Creamed with coconut milk, herbs and spices, they delight your taste buds, quell your comfort food cravings and make both your belly and your cells very happy. Use it for a killer Shepherd’s Pie or to make GlowTato Pancakes for breakfast, just JingSmack with minced chives and give them a fast flip in your skillet. 

Gather Up 

I large Cauliflower
½ cup (120ml) Coconut Milk
4-6 Cloves Roasted Garlic
3 TB Ghee or SuperFood Shortening
¼ tsp Black Truffle Salt or Sea Salt (to taste)
¼ tsp Fresh Ground Black Pepper (to taste)

Jing It Up (options)

½ tsp Chaga
1 tsp Pearl
1 TB MCT Oil

Sling It Up

Preheat oven 350°F/177°C.

For the roasted garlic, simply cut the top point off of a whole garlic bulb thus exposing the tops of the cloves. Drizzle with MCT oil and a pinch of sea salt. Wrap in parchment paper and then wrap in tin foil and place in the oven at 350°F/177°C for 30 minutes or until soft.

Cut the cauliflower into bite-sized pieces and steam until very tender, soft to the touch. Toss all of the ingredients into your food processor, except for the coconut milk and spin it until it is well incorporated. Then add the coconut milk, a splash at a time until you get smooth mashed potato consistency. Taste for spice tweaking, or for extra ghee or coconut milk. We always finish with more black truffle salt for a deeper umami yum factor.

#Hashbrowns

This Spaghetti Squash is the perfect upgrade for conventional potatoes and you’ll see why, because they bring the antioxidants lutein and zeaxanthin to your breakfast table, which are known to bolster optimum healthy vision. These Hash Browns are perfect for any meal of the day, supplying your gut with beneficial fiber and lots of trace minerals to nourish your cells. 

# Hashbrowns

Gather Up

1 medium Spaghetti Squash, halved and seeded
1 medium Onion, sliced
½ tsp Black Pepper
½ tsp Black Truffle Salt or Sea Salt
½ tsp Garlic Granules
½ tsp All Purpose Seasoning
2 TB Coconut Oil

Jing It Up (options)

½ tsp Astragalus Powder
½ tsp Chaga Powder
1 TB MCT Oil

Sling It Up

Pre-heat oven to 350°F/177°C.

Cut the spaghetti squash in half the long way, from stem to stern. Scoop out the seeds. You are going to want to seed save these seeds, as they easily grow in most climates, even right on your patio. Season the flesh with half of the spices and place flesh down on a parchment paper lined baking sheet. Bake in the center rack in your oven for about 35-40 minutes, until fork tender. 
Remove from the oven and scoop the flesh out into a hot skillet with coconut oil and the sliced onions. 

Sauté the remaining spices and the Jing It Up options with the onions, until the desired Hash Brown texture is reached. 

Garnish with chives and shredded carrots.

Heart Beet Rawvioli

Raw, Vegan and Paleo dinner in minutes without the oven or stovetop!! This ravioli pumps up your Nitric Oxide levels to support a healthy heart and circulation. Nobel Laureate in Medicine, Dr. Louis Ignarro explained that by boosting the nitric oxide levels our body we can prevent and even reverse heart disease. Beets are one of the top foods that deliver this protection. The “Pasta” is thinly sliced raw beet, with a 30-minute quick marinate in olive oil and spices. Choose your favorite filling and dinner is served.

Raw, Vegan and Paleo dinner in minutes without the oven or stovetop!! This ravioli pumps up your Nitric Oxide levels to support a healthy heart and circulation. Nobel Laureate in Medicine, Dr. Louis Ignarro explained that by boosting the nitric oxide levels our body we can prevent and even reverse heart disease. Beets are one of the top foods that deliver this protection. The “Pasta” is thinly sliced raw beet, with a 30-minute quick marinate in olive oil and spices. Choose your favorite filling and dinner is served.

Heart Beet Ravioli

Gather Up

(For Pasta)
2 large Raw Beets, peeled
¼ cup Olive Oil
¼ tsp Black Truffle Salt or Sea Salt
¼ tsp Garlic Granules
(for Pesto)
2 cups Fresh Basil Leaves, packed tight
¾ cups Pine Nuts or Pistachios, toasted
5 TB Extra Virgin Olive Oil
1 TB MCT Oil
½ tsp Sea Salt or Black Truffle Salt
¼ tsp Fresh Ground Black Pepper
1 tsp Maca Powder
1 tsp Lemon Juice 

Almond Cheese Filling

1 cup (227g) Kite Hill Almond Ricotta Cheese or Homemade Nut Cheese Option*
2 cups (200g) Pine Nuts, soaked
3 TB Nutritional Yeast
2 TB Lemon Juice
¼ tsp Garlic Granules
½ tsp Sea Salt
¼ tsp Fresh Ground Black Pepper
4-6 TB (90ml) Coconut Milk
Probiotic Powder, from 3 opened capsules

Sling It Up (options)

Peel the beet and slice on the thinnest setting of your mandoline. Using a heart-shaped cookie cutter, cut each beet slice by simply pressing down on the slice, one at a time, with the sharp edge of the cookie cutter. Toss the beet hearts in the olive oil and spices in a small bowl and allow to marinate in the refrigerator for at least 30 minutes, the longer the more tender.

Place all the pesto ingredients into your food processor and pulse adding the olive oil, one tablespoon at a time, until the pesto comes together, and set aside.

If you choose to buy the Kite Hill Almond Ricotta, just mix in a bowl with a splash of coconut milk, salt, pepper and garlic granules (to taste) until a thick spreadable cheese forms.

*If you choose to do the homemade recipe- Soak the pine nuts for 1-hour, then discard the soak water. Place all prepared ingredients into your clean food processor except the coconut milk, and pulse while adding the milk one tablespoon at a time until a thick spreadable cheese forms. Taste and tweak spices as you wish.

Assembly and Serving: Place one heart-shaped beet on the plate, put a dollop of nut cheese, (a dollop of Gratitouille filling is optional but awesome here) and place the top heart-shaped beet over the fillings. Arrange the stuffed hearts on the serving plate and dress with the Pesto and Goji Balsamic. Garnish with spiralized carrots, beets and zucchini. These make great party appetizers too!

JingSmacked Kitchari

In the United States today, juice fasting is one of the most popular forms of detoxification, but in Ayurveda, they use Kitchari, which is both cleansing and rejuvenating. Kitchari is a combination of white basmati rice and split yellow mung beans. Both of these foods are specifically good for each of the Ayurvedic Dosha (body) types. It is very easy to digest and is often given as the first food for infants as well as for people who are healing in the hospital. It can be made and enjoyed as a solo meal, or eaten as every meal for days or weeks at a time. This latter application gives rest to the digestive system and allows the body to detoxify. 

We love to supercharge our Kitchari with tasty Jinged-Up SuperFoods! Astragalus for immunity and upright Qi force, mucuna for brain enhancement and a natural dopamine boost, and SugaVida for broad spectrum B Vitamin nutrition and amazing flavor.

People who have weak digestion can change the ratio of rice to beans to 2:1 or even 3:1, in favor of more rice. Split yellow mung beans are also sold as "dahl beans." Kitchari will last well in the refrigerator for 3-4 days. Reheat on a stove top or in your oven.

Jingsmacked Kitchari

Jing It Up (options)

1 TB Mucuna
1 TB Sugavida
1 TB Astragalus

Gather Up

1 cup (225g) dried White Basmati Rice
1 cup (225g) dried Split Yellow Mung Beans
8 cups (2000ml) Water
2 tsp Yellow Curry Powder
1 tsp Cumin Powder
½ tsp Garlic Powder
¼ Black Pepper Powder
¼ tsp Cardamon Powder
½ tsp Sea Salt
½ tsp Cinnamon Powder
1 Whole Carrot, grated
1 cup fresh greens, Spinach, Kale, etc
½ cup fresh Onion, diced
4 TB Ghee or SuperFood Shortening

Sling It Up

Pour the split yellow mung beans onto a baking sheet or flat surface and pick out any stray little stones.  Soak the white basmati rice and split yellow mung beans together in a bowl, covered with at least an inch of water. Let them soak for a few hours, or even overnight. If you are in more of a hurry, you can boil the water, and soak them in the boiled water for an hour. In every case, discard the soak water. In a separate pot on the stove, bring your 8 cups of water to a boil, then add the rice, beans, powdered spices and ghee (or SuperFood Shortening). Let it cook on a gentle boil for about 10 minutes, then bring it down to a simmer for another 15-25 minutes. Midway through the simmering process, add your fresh vegetable ingredients. If it is starting to stick on the bottom of the pan, add another ½ - 1 cup of water and reduce the heat. The final texture of your Kitchari will be soft, like a very soft porridge. You can customize the texture of the fresh vegetables however you prefer them, cook them more if you want them soft, cook them less if you want to have a little crunch left in them. 

Jingsmacked Kitchari

Silken Kabocha Bisque

Soup has always been a favorite comfort food, especially when there is a chill in the air. A cup of soup warms your hands and your heart. These soups have both flavor and function. Kabocha contains naturally occurring beneficial pectins, which are polysaccharides that have been shown to have anti-inflammatory and even blood sugar balancing properties. This SuperHero Squash is known around the world for its aphrodisiac effects, however, a chic cheat for this recipe is to swap out the two cups of fresh Kabocha for two cups of frozen butternut squash.

Silken Kabocha Bisque

Sling It Up

Pre-heat oven 365°F/185. Cut the squash in half. Remove the seeds and then sprinkle the flesh with black pepper, black truffle salt and garlic granules. Bake it (flesh down, skin on) on a parchment lined sheet pan until fork tender, about 30-45 minutes.

While it is baking, sauté the onion with the coconut oil and a pinch of truffle salt and black pepper in the bottom of a soup pot (which will ultimately hold the whole soup) until fork tender/translucent. 
Once cooked, transfer to your blender/food processor. A high performance blender works best.  

Once the squash is cooked, scoop the flesh from the skin. Add the two packed cups of squash to your blender and one cup of the water along with the coconut milk, rosemary and spices. Save the half-cup of water to use for smoother blending, if needed. When using a blender, put a towel over the vented lid and blend at a low speed, gradually increasing the speed. Blend on a medium setting until smooth. Add additional salt and pepper to taste.

Pour the contents back into the soup pot to warm. Thin with additional coconut milk and water if a thinner consistency is desired. 

(optional) Serve with a swirl of pumpkin seed oil and coconut milk on top, and garnish with whole shelled, spiced pumpkin seeds (sold in bags at Whole Foods) and a sprinkle of truffle salt. 

Yields about six, one cup (250ml each) servings.

Gather Up

1 TB Coconut Oil
½ cup (75g) Onion, diced
2 cups (500g) Kabocha Squash, baked
1½ cup (375ml) Water
2 cups (500ml) Coconut Milk
2 tsp (packed) Fresh Rosemary, chopped
(leaves, no stems)
1 tsp Black Truffle Salt or Sea Salt
1 tsp Black Pepper
1 tsp Garlic Granules
Spiced, Shelled Pumpkin Seeds (optional garnish)
Styrian Pumpkin Seed Oil (optional garnish)

Jing It Up (options)

1 TB Ghee
1 tsp Chaga Powder
1 tsp Maca Powder
2 tsp Pearl Powder
2 TB Collagen Powder

Silken Kabocha Bisque Meal

Maca Chocolate Pancakes

Pancakes are all about lazy weekend mornings and breakfast in bed! This is a chocoholic’s wish come true! Chaga powder will bolster your immunity and you can Jing Up your hormones with the maca powder. Bring them to a whole ‘nother level by adding “I Love You Berry Much” Strawberry JingLato between each layer and topping with Coconut Whipped Cream as pictured below.

These pancakes flip easily from Paleo to Vegan. If you are making the Vegan version, the swap is simple. It is important to use the fine ground almond flour from Honeyville, otherwise the pancakes can be a little bit grainy. 

Maca Chocolate Pancakes

Jing It Up (paleo or vegan)

2 tsp Maca Powder
1 tsp MCT Oil
1 tsp Chaga Powder or
Restore the Jing 

Gather Up (paleo)

2½ cups (315g) fine ground blanched Almond Flour
½ cup (65g) of Otto’s Cassava Flour
¼ tsp Baking Soda
¼ tsp Baking Powder
⅛ tsp Sea Salt
3 TB Cacao Powder
3 TB Xylitol Powder, to taste
6 large Eggs
¾ cup (180ml) Coconut Milk
1 tsp Lemon Juice
½ tsp Vanilla Stevia
½ tsp Chocolate Stevia
¼ cup (60ml) Water
¼ cup (46g) Lily’s Sugar Free Chocolate Chips
Ghee, SuperFood Shortening or Coconut Oil for pan cooking


Sling It Up (paleo)

In a medium bowl, sift and/or mix together the dry ingredients and then add the chocolate chips. In a separate bowl, or in your blender, blend together the water, eggs, lemon juice, coconut milk, stevia and vanilla extract until creamed and frothy. Add the liquid ingredients to the dry ingredients and mix well. Let it meld for a few minutes. The gluten-free flours are very thirsty flours and by allowing them to soak up moisture you get a better pancake.

Heat your skillet over medium to low heat with a heaping tablespoon of coconut oil, ghee, or SuperFood Shortening. Add about 2 tablespoons of pancake batter to the pan, we use an ice cream scoop and smooth them with a spoon so they are not dome shaped. If you have trouble flipping the pancakes, try making them smaller about 3-4 inches wide. A wide, super-thin blade on the spatula is the secret to flipping these successfully.

Cook the pancake until it starts to bubble and the edges just start to brown up then you can flip. These cook quickly! Flip carefully. You can keep the pancakes in a warm oven until ready to serve. We like to make them ahead of time, freeze them and put them in the oven on a parchment lined sheet pan to reheat.

Sling It Up (vegan)

All the ingredients and blending instructions remain the same except you will delete the eggs/ghee and increase the coconut milk to 1½ cups, the water to ½ cup and add in ¼ cup melted coconut oil into the wet ingredients when blending. These will be spooned onto a parchment lined sheet pan, smoothed into the pancake size and thickness you want. Bake in the oven at 375°F/191°C for about 25 minutes. They should puff up a bit and be firm to the touch when finished. Bonus! They all can be done at the same time. They are too delicate to cook in a skillet but come out perfect on parchment.

Sweet Potato Naan

Three ingredient SuperFood Naan! These beta-carotene rich Grain-Free Naan rounds double as yummy wraps or tortillas. Switch up the spices for either a sweet or savory bread or crust. The water content of the sweet potato is uber important. Therefore, the raw sweet potatoes MUST be steamed and not baked, to create the mash. These Naan remain soft and pliable for sandwiches, wraps or add a sliced baked apple for an apple pie on the fly! 

Sweet Potato Naan

Gather Up

  • 2 cups (500g) Sweet Potato, steamed & mashed
  • 2 cups (250g) Cassava Flour
  • 1 TB Psyllium Husk Powder
  • ¼ tsp Cinnamon or Cumin (optional)
  • Pinch of Sea Salt

Sling It Up

Place two whole, unpeeled medium-sized sweet potatoes in a covered pot, fitted with a steamer basket. Do not allow the sweet potatoes to sit in the water, steam until fully fork tender. Once tender, slide the peels off while they are still hot and mash with a fork in a medium-sized bowl. While still hot, quickly mix in the rest of your ingredients until it forms a soft dough. 

With floured hands and on parchment paper, roll into a log shape and divide into six even sections. With your hands, form each section into a round disk. One by one roll out each disk into a ¼ inch thick, round tortilla. Place the finished tortilla into a deep dish or bowl, lined and covered by two clean dish towels to maintain warmth. Stack each tortilla on top of the last one in the bowl, until all six are completed and remain covered.

Heat a skillet or crepe pan over medium heat. Using a coconut oil spray, very lightly spray your pan. Cook each flatbread, one at a time, flipping each one every 30 seconds. They may balloon up as the heat releases the steam, after the second flip. Keep flipping them until they are cooked through and still pliable. (This takes a few flips on each side, depending on how wet your sweet potatoes were). If they are sticking, adjust your heat accordingly. 

Keep them warm by stacking them as each is finished in the same towel-lined bowl. They are now ready to eat and they freeze beautifully for later use. They will keep in the refrigerator in a sealed container for 5-7 days. 

Sweet Potato Naan