Quick Coconut Flour Flatbread

This is a Vegan & Paleo 1-bowl, 1-spoon recipe that takes mere minutes to make! With all the benefits that coconut brings to your plate, plus hormone boosting with a blast of maca, who could ask for more from your sandwich? Freestyle with this adaptogenic bread, as it will make a grilled Panini sandwich (facing page) as easily as a flatbread appetizer for unexpected guests. Recipe yields 4-6 flatbreads.

Gather Up

½ tsp Garlic Granules

⅛ tsp Black Pepper

⅛ tsp Sea Salt

1 cup (250ml) Water, boiling

½ cup (65g) Coconut Flour

2 TB Psyllium Husk Powder

¼ cup (60g) Coconut Oil, melted

2 tsp Fresh Rosemary Leaves, minced (no stems)

Jing It Up

1 tsp Maca Powder

1 tsp MCT Oil

Sling It Up

Put all the dry ingredients into a bowl. Stir with a spoon until it is well mixed. Add the melted coconut oil into the mixture and stir in the boiling water as you pour it in. Once mixed and cool enough to handle (just a few seconds), hand roll into a ball, then split the ball into four or six equal pieces.

On a piece of parchment paper, individually flatten each quarter into a flat disk, either by hand, or with a rolling pin and a second piece of parchment paper, so that the disk is about ⅛  inch thick. Using our hands is our method.

Use your favorite skillet, or crepe pan. You can use no oil or you can very lightly spray/oil with either ghee or coconut oil. Put the pan on medium heat. Drop the disks into the pan one at a time, cook until it is lightly browned on one side, then flip and lightly brown on the opposite side. A super thin spatula makes it easy to flip.

This flatbread is both flavorful and flexible and can be made in a hot pan with NO oil, but you need to watch it like a hawk so it does not burn or stick, as without the oil it can do both quickly!

Flatbreads will stay fresh in the refrigerator in a sealed container/bag for 3-5 days. They freeze beautifully up to 30 days. Can be made into pizza, sandwiches, panini, gyros, pita, etc.


Banana Bread


Gather Up

1 stick (8 TB) Organic Butter

(or 8 TB Nutiva SuperFood Shortening)

1 cup Golden Lakanto (or 3/4 cup Birch Xylitol)

2 large Eggs

(or 8 TB “JingSlinger Chia Eggs”)

1 cup fine milled Almond Flour

½ cup Arrowroot Flour

½ cup Coconut Flour

3 medium-large very ripe Bananas, mashed


1 - 1 ½ cups rough chopped Walnuts

1 teaspoon Cinnamon

2 teaspoons Vanilla Extract

4 TB Grassfed Cream

(or full-fat Coconut Milk )

¼ teaspoon Baking Soda

¼ teaspoon Baking Powder

2 teaspoons Lemon Juice

½ teaspoon Vanilla Crème Stevia (Sweetleaf brand)

(add more sweetener to taste)

Jing It Up (Options)

1 teaspoon Pearl Powder

1 teaspoon Maca Powder

2 teaspoons Bulletproof Brain Octane Oil

½ cup Lilly’s Sugar-Free Chocolate Chips

Sling It Up

Incorporate the butter and Lakanto/birch xylitol with the vanilla stevia and vanilla extract with your hand mixer or stand mixer.

Sift all the dry ingredients until well mixed in a separate bowl.

Mix in one egg (or tablespoon of chia egg) at a time into the butter/sweetener bowl until well blended.

Next stir in the dry ingredients ½ cup at a time (except walnuts & chocolate chips), until fully incorporated.

Add the lemon juice and grassfed cream (or full-fat coconut milk) and Brain Octane Oil, and mix well.

Hand mix in the mashed banana and taste for sweetness. Add any additional sweetener if desired or coconut milk/cream for a thinner batter consistency. Batter should be the consistency of frosting or almond butter.

Hand mix in the walnuts and chocolate chips.

Pour into a greased (grassfed butter or coconut oil) loaf pan/dish and bake at 365 degrees.

Cook in your oven on the middle of the middle shelf. Usually takes about 45-60 minutes in a convection oven. The banana bread is ready when a toothpick tests clean from the center of the bread and the top is golden brown.

JingSlinger Chia Vegan Egg Replacement

When you Google “Vegan Egg Replacement” and everything from applesauce to flax eggs pop up, what’s a chef to do? After testing hundreds of recipes designed for our discerning Vegan clients, the popular “1 tablespoon chia seed to 3 tablespoons of water” falls short for both taste and chemistry… it works okay, but it is not stellar. Our science geekitude is showing again, so hang with us this is a good thing!

First objective, how does it behave in the texture of your muffin/cake? Second objective, how does it behave in your body? We prefer chia to flax first because it packs more protein like an egg would and chia is not über estrogenic, so it doesn’t jack with your hormones. Chia seeds do not go rancid with the same quickness that flax tends to, and trust us, you don’t want rancid oils in your blood stream! Our JingSlinger Chia Egg is based on the culinary chemistry one large chicken egg brings to the table in baking for both flavor and texture.

Gather Up


1 TB freshly ground Chia Seed, measured after the grinding…
über important detail (there is the protein profile we want)
4 TB warm Water
1 tsp Coconut Oil (for the healthy fat component)

Sling It Up

Pour the 4 tablespoons of water and the 1 teaspoon of oil into a small bowl. Grind the chia seeds in your coffee or spice grinder, or powderize old-school style with a mortar and pestle, until you get a fine powder. Measure the 1 level tablespoon of the now ground chia into the water, a little at a time while whisking briskly to avoid clumps. Let it do its gel thing either on the counter top or in the fridge. When you measure it into a recipe, it will be 4 level tablespoons of the now gelled chia egg mixture for each egg called for in the recipe.

So one large egg equals = 4 tablespoons of a JingSlinger Chia Egg.
One cup of eggs equals = 4 JingSlinger Chia Eggs.

Note that a chia egg does not provide much or any rise or lift but it does allow the batter to come together and the protein aspect keeps it together. This egg does not whip into meringue or work in Pâte À Choux recipes. Chia eggs do impart a slight nutty flavor not so noticeable in chocolate or spice cake type recipes but in vanilla you may detect it. For lift and rise and a fluffy or more tender cake, muffin or cupcake you gotta deploy the special alchemical forces of lemon juice, apple cider or white vinegar with baking soda and or aluminum-free, non-GMO baking powder.

Thrillah Vanillah… Batter Up! (vegan)

Voila! Vegan Vanilla CakeCuppery for every celebration! Armed with this Gluten-Free, Sugar-Free, Soy-Free JingSlinger recipe in your “I Can’t Believe It’s Vegan” repertoire will have your friends saying, “Reci-Please!” Sling this better batter to avoid sugar crashes and glycation. Plus vanillic acid has also been shown in studies to alleviate inflammation via the NF-Kb and COX-2 pathways. Too much science? Just make the Cupcake!

Gather Up

Organic Coconut Milk

½ cup (110ml) Coconut Oil, melted

3 tsp Vanilla Stevia

2 tsp Vanilla Extract

2 tsp White Vinegar

2 tsp Lemon Juice

1 TB Water

½ tsp Sea Salt

⅛ tsp Almond Extract

1¼ cup (155g) Pamela’s Artisan Blend

All-Purpose Flour

1¼ cup (250g) Xylitol Powder

½ tsp Baking Soda

1 tsp Baking Powder

⅛ tsp Vanilla Bean Powder

3 TB Honeyville Blanched

Ultra Fine Almond Flour

1¼ cup (310ml) Pacific Unsweetened


Jing It Up (options)

1 tsp Maca

1 tsp MCT Oil


Sling It Up

Preheat oven to 375°F/191°C. Lightly coconut oil the pan(s) and dust with the gluten-free flour. In cake pans, add a piece of parchment paper cut to fit the bottom of the pan.

In one large bowl, combine all of the dry ingredients, except for the almond flour. In your blender, add the almond flour, along with your wet ingredients: Pacific unsweetened coconut milk, vanilla extract, vanilla stevia, coconut oil, white vinegar and lemon juice and blend on a medium setting. Blend for 30 seconds. Immediately pour the wet ingredients from the blender into the dry ingredients and mix with a large spoon or spatula until all the lumps are gone. Add the remaining one tablespoon of water to smooth and finish the batter. Quickly pour the batter into the prepared pan(s) and place in the oven. It is important to work fast, so you don’t lose the rise from the (al)chemical reaction that makes the cake light and springy.

Bake at 375°F/191°C in the center rack of the oven until a toothpick comes out clean. It is IMPORTANT not to open the oven during the first half of the baking time, however checking with a wooden toothpick at the center of the pastry will tell you when it is done. Everyone’s oven is different and convection ovens always bake faster. Your physical climate and elevation also affects the level of rise and length of cook time. Here are baking guidelines for this batter:

10-15 minutes for Madeleines and Whoopie Pies

15-20 minutes for Cupcakes and Doughnuts

30-40 minutes for 4-6 inch (10-15cm) Cakes

40-60 minutes for 8-10 inch (20-25cm) Cakes

Allow it to cool in the fridge before icing, coating or glazing.

Top with out Coconut Whipped Cream!

JingSlinger Chocolate Sauce

Heirloom Chocolate, the "Food of the Gods," is loaded with a staggering array of nutrients and feel-good complex compounds. This ain't your dime-store chocolate! This recipe is the glaze for our Epic Eclairs, it is the chocolate shell and ripples in our JingLatos, it is what our Doughnuts prefer to be dressed in...there are so many uses for this one recipe throughout this cookbook! 

Cacao beans are stacked with cell supporting minerals such as calcium, chromium, iron, magnesium, and zinc, as well as many different types of antioxidants. It is jam-paled with neurotransmitters such as PEA and anandamide, which is known as the "bliss chemical." Cacao also brings tryptophan to the table, a precursor to serotonin. Cacao contains several vasodilators, making it one of our favorite ingredients for combining with additional SuperFoods and Tonic Herbs for better delivery. 

Gather Up

1 cup (125g) Cacao Powder, sifted
1/4 cup (60ml) Coconut Oil, melted
1/4 cup (6oml) Cacao Butter, melted
1/2 cup (200g) Xylitol Powder, sifted
1/2 tsp Vanilla Stevia
1/2 tsp Chocolate Stevia

Jing It Up (options)

1 tsp He Shou Wu
1 tsp Pearl Powder
1 tsp Restore the Jing

Sling It Up

Over a medium saucepan containing about two inches of water, simply fit a heatproof metal bowl on top, so that the bottom of the bowl is not touching the water. Bring the water to a simmer, then turn it down to low heat. Add the coconut oil and cacao butter to the bowl and stir once they are liquid. Add the stevia and stir well. Add the sifted cacao powder and xylitol powder, stirring until well incorporated. Sprinkle in your Jing It Up options, while stirring. Taste the chocolate and if you would like it sweeter, add additional sifted xylitol powder, one tablespoon at a time until it reaches your desired sweetness. 

Chic Cheat - Quick & Easy Melted Chocolate Glaze

Melt 9oz (255g) of Lily's Sugar-Free Chocolate Chips (or a Lily's Chocolate Bar roughly chopped) along with a teaspoon of MCT oil or a teaspoon of ghee in a heatproof bowl over two inches of simmering water in a medium size pan (so that the water does not touch the bottom of the bowl). This is an instant chocolate shell, just looking for ice cream! Or mix with an equal amount of puffed quinoa and spoon into silicone molds and refrigerate for a crunchy chocolate treat and cupcake accessory. 

Acai Triple Berry JingLato

This is one of our all-time favorite JingLatos. There are endless combinations of SuperFoods and Tonic Herbs that can go into this ice cream, particularly anything that plays nicely with berries. We love the anti-inflammatory effects of the acai berry and the blueberry base. E3Live Blue Majik can up the ante even further, while melding seamlessly into the flavor. Arnox Advantage increases nitric oxide and the circulatory properties of this dessert, while boosting a strawberry flavored undertone. Want it calming, with a floral undertone? Add rose water. Want to boost the anabolic effect? Add the colostrum, or add protein powder. It’s easy to enjoy this JingLato on a regular basis, because it has so many options, and makes you feel so good! 

Acai Triple Berry Jinglato Ingredients
Acai Triple Berry Jinglato

Gather Up

2 packets (200g) Unsweetened Frozen Acai
¾ cup (144g) Frozen Wild Blueberries
½ cup (120 ml) Coconut Milk
½ TB Lecithin
1 TB Acai Powder
1 TB Xylitol Powder
¼ tsp Vanilla Stevia
Pinch of Sea Salt

Jing It Up (options)

½ tsp Rose Water
½ tsp E3Live Blue Majik Powder
½ TB Arnox Advantage
½ TB Miracle Reds
2 TB Colostrum Powder
2 TB Collagen Powder, Whey Protein, or Vanilla Vegan Protein

Primal Paleo (option)

Want to take it to the next level? Add ¼ cup (100g) of grass-fed bison bone marrow. Add an additional 1-2 TB of lecithin powder to help the marrow integrate into the JingLato, which will end up with a much lighter, mousse-like consistency. 

Sling It Up

Add the coconut milk to your blender. Run the acai packets under room temperature water for 3-5 seconds, then break them into 4-6 pieces and cut them open. Place the frozen acai, along with the rest of your ingredients and Jing It Up options into the blender. Pound with your tamper, until smooth and thick. 

GlowTatoes

Cauliflower makes this mash a winner, no nightshade aches from these taters! Creamed with coconut milk, herbs and spices, they delight your taste buds, quell your comfort food cravings and make both your belly and your cells very happy. Use it for a killer Shepherd’s Pie or to make GlowTato Pancakes for breakfast, just JingSmack with minced chives and give them a fast flip in your skillet. 

Gather Up 

I large Cauliflower
½ cup (120ml) Coconut Milk
4-6 Cloves Roasted Garlic
3 TB Ghee or SuperFood Shortening
¼ tsp Black Truffle Salt or Sea Salt (to taste)
¼ tsp Fresh Ground Black Pepper (to taste)

Jing It Up (options)

½ tsp Chaga
1 tsp Pearl
1 TB MCT Oil

Sling It Up

Preheat oven 350°F/177°C.

For the roasted garlic, simply cut the top point off of a whole garlic bulb thus exposing the tops of the cloves. Drizzle with MCT oil and a pinch of sea salt. Wrap in parchment paper and then wrap in tin foil and place in the oven at 350°F/177°C for 30 minutes or until soft.

Cut the cauliflower into bite-sized pieces and steam until very tender, soft to the touch. Toss all of the ingredients into your food processor, except for the coconut milk and spin it until it is well incorporated. Then add the coconut milk, a splash at a time until you get smooth mashed potato consistency. Taste for spice tweaking, or for extra ghee or coconut milk. We always finish with more black truffle salt for a deeper umami yum factor.

BuckShot

Nutrient dense enough to be a meal on the go, yet delicious enough to be dessert. This vanilla frosting can be eaten as a power-packed snack, or can be used as a kick-ass icing and also a cream filling on pretty much anything.

Buckshot

Jing It Up (options)

1 TB Collagen Powder (optional)
½ tsp Deer Antler
1 tsp Pearl  Powder
A pinch of Sea Salt

Gather Up

¼ cup (30g) Colostrum Powder
¼  cup (85g) Ghee
2 TB  Whey Protein Powder
¼ tsp Vanilla Stevia
1 tsp Birch Xylitol Powder
OR
1 TB Organic Raw Honey
A pinch of Sea Salt

Sling It Up

Mix all ingredients in a small bowl, stirring well until fully incorporated and smooth. The ghee should be soft, if your ghee is hard at room temperature, you can soften it by simply stirring it  and creaming it into the powders vigorously... a little kitchen Cross-Fit for your forearms. If your whey powder is already sweetened, then adjust your sweeteners of choice accordingly. This recipe doesn’t need to be refrigerated because ghee is stable at room temperature. BuckShot travels beautifully in a sealed container for days.

Vegan icing doesn’t have the same anabolic bang of the Paleo version BUT here is the swap out - 
1 cup raw Thai Coconut Meat, ⅓ cup SuperFood Shortening, ¼ cup Coconut Milk, ¼ cup Xylitol Powder, 2 TB of your favorite Vanilla Protein Powder, Vanilla Stevia to taste. Blend the coconut meat and milk in your food processor and add the remaining ingredients blending until icing smooth.

Cacao Jumped Over the Moon CakePhoria

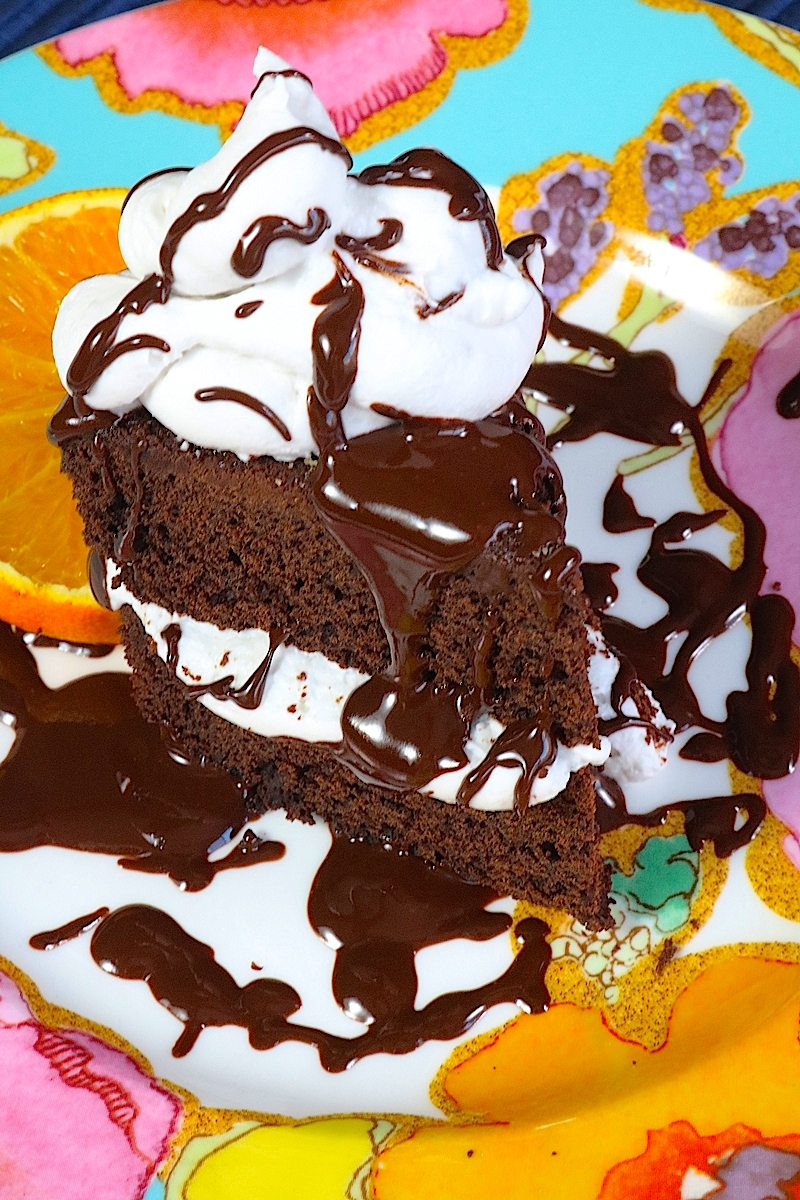
Flourless, Grain-Free, Sugar-Free, Paleo Chocolate Cake Bliss... this is a magnesium, anandamide and protein packed behemoth, it is a celebration on a plate! Dress this with Coconut Whipped Cream, fresh berries and a drizzle of our melted JingSlinger Chocolate Sauce for a 5 star restaurant experience without a sugar crash. The stress reducing magnesium and mood elevating anandamide are nutritional ninjas that will help centered and somewhat euphoric... hence “CakePhoria!”

Cacao Jumped Over the Moon Cakephoria

Gather Up

16 oz (454g) Lily's Sugar-Free Dark Chocolate Baking Chips
(or Lily’s Bars, chopped)
10 Large Eggs, separate the yolks from the white
(no yolks at all in the whites!)
¾ - 1 cup of Xylitol Powder (or more to taste) 
8 TB (112g) Unsalted Butter
1 tsp Vanilla Extract
½ tsp Vanilla Stevia
1 tsp Chocolate Stevia
⅛ tsp Cream of Tarter
Fresh Raspberries (optional garnish)

Jing It Up (options)

2 tsp Restore the Jing
1 tsp Pearl Powder
1 tsp Maca Powder
1 tsp Chaga Powder

Sling It Up

Preheat the oven to 350°F/177°C. 

Butter an 8, 9, or 10-inch (20, 23, or 25cm) spring form pan or several 3 or 4-inch (8 or 10cm) cake pans for individual servings and place an unbleached circle of parchment in the bottom. (We always wrap the outside bottom of the spring form pan with tin foil so no water seeps into the cake pan while baking.) Add 2 inches of hot water into a larger oven safe pan so your cake bakes in a water bath. 

Put the chocolate chips/ chopped bars and butter into the top of a double boiler (or in a heatproof metal bowl) and heat over (but not touching) about 1 inch of simmering water until melted.

Meanwhile, whisk the egg yolks with the xylitol powder in a mixing bowl until light yellow in color. Whisk a little of the chocolate mixture into the egg yolk mixture, once the chocolate has fully melted, to temper the eggs - this will keep the eggs from scrambling from the heat of the chocolate - then whisk in the rest of the chocolate mixture, stirring in the herbs, vanilla extract and vanilla stevia & chocolate stevia. Set aside.

Beat the egg whites and cream of tarter in a mixing bowl until stiff peaks form (a stand mixer works best, but an electric hand mixer works too). Now fold the chocolate mixture into the egg white mixture a quarter at a time, with a large spoon or spatula until it becomes a well-incorporated chocolate batter. Pour into the prepared pan and bake for about 35-45 minutes, until a toothpick inserted into the cake comes out mostly clean with some moist crumbs. Let it cool for about 30 minutes at room temperature and then chill in fridge for an additional 20-30 minutes to set. Then you can remove the sides of pan. For the small pans, run a knife or thin bladed spatula around the inside edge to release the cake.

Serve cake at room temperature with berries and topped with Coconut Whipped Cream.


Cacao Jumped Over the Moon Cakephoria

#Hashbrowns

This Spaghetti Squash is the perfect upgrade for conventional potatoes and you’ll see why, because they bring the antioxidants lutein and zeaxanthin to your breakfast table, which are known to bolster optimum healthy vision. These Hash Browns are perfect for any meal of the day, supplying your gut with beneficial fiber and lots of trace minerals to nourish your cells. 

# Hashbrowns

Gather Up

1 medium Spaghetti Squash, halved and seeded
1 medium Onion, sliced
½ tsp Black Pepper
½ tsp Black Truffle Salt or Sea Salt
½ tsp Garlic Granules
½ tsp All Purpose Seasoning
2 TB Coconut Oil

Jing It Up (options)

½ tsp Astragalus Powder
½ tsp Chaga Powder
1 TB MCT Oil

Sling It Up

Pre-heat oven to 350°F/177°C.

Cut the spaghetti squash in half the long way, from stem to stern. Scoop out the seeds. You are going to want to seed save these seeds, as they easily grow in most climates, even right on your patio. Season the flesh with half of the spices and place flesh down on a parchment paper lined baking sheet. Bake in the center rack in your oven for about 35-40 minutes, until fork tender. 
Remove from the oven and scoop the flesh out into a hot skillet with coconut oil and the sliced onions. 

Sauté the remaining spices and the Jing It Up options with the onions, until the desired Hash Brown texture is reached. 

Garnish with chives and shredded carrots.

Chia Pudding 101

Famous because of the Chia Pet craze of the 1980s, chia seed became famous as a SuperFood when it was written about as a staple in the diet of the Tarahumara Native Americans, the greatest ultra distance runners in the world, in the 2009 New York Times Bestselling Book “Born to Run.” As the name suggests, “Chi-a” (Chi/Qi) is a high-energy and endurance food. It is very hydrophilic, it’s loaded with soluble fiber, which gelatinizes in liquid. Gelatinize some chia seed, add some protein, some fat and you’re good to go. Add some additional SuperFoods and Tonic Herbs, and you are WAY good! When gelatinizing chia seed, your liquid should to be at least room temperature. Cold liquids do not work well. When using most protein powders, or a polyunsaturated fat like Styrian pumpkin seed oil, keep the temperature down below 120°F/49°C. If you are using collagen powder and saturated fats with high heat tolerances, you can make a hot Chia Pudding, which is excellent in the winter months. 

Chia Pudding 101

Gather Up

1 cup (250ml) Coconut Milk
½ cup (120ml) Water
¼ cup (50g) Chia Seeds
2 TB Whey Protein/ Vanilla Vegan Protein
½ tsp Vanilla Stevia
1 tsp Xylitol Powder (or more to taste)

Jing It Up (options)

1 tsp Pearl Powder
½ tsp Vanilla Bean Powder  
1 tsp – 1 TB MCT Oil
1 TB Ghee/ Coconut Oil
2 TB Colostrum Powder

Sling It Up

Add the coconut milk and water to a small pan and heat on the stove to about 110°F/43°C so it’s just hot to the touch. Remove from stove and transfer to a heatproof container, like a Pyrex measuring cup. Add the chia seeds. Stir well, and continue stirring a couple times per minute, for about 10 minutes, or until it gelatinizes to a thick consistency.

Add the soaked chia seeds into your blender and add the rest of your ingredients. 

Coconut Crème Brûlée Divinity

Our Rock Star approved buttery Crème Brûlée infused with fragrant raw vanilla bean and spun from coconut meat, coconut cream, coconut oil, and coconut milk is the perfect nosh any time of the day.  It is extremely hydrating, assists with rejuvenating oxidative tissue damage and supports the function of our nervous system. The concentrated MCT oil helps burn fat and fuels your brain while the caprylic, capric and lauric acid properties are antimicrobial, antifungal and antibacterial so your immune system gets some love too… Oh… and it is flippin’ delicious. 

Coconut Creme Brûlée Divinity

Gather Up

2 cups (454g) Raw Young Thai Coconut Meat
½ cup (120ml) Coconut Cream
⅓ cup (75ml) Coconut Milk
1 TB of Coconut Oil
½ cup Xylitol Powder
2 TB Sunflower Lecithin Powder
¼ tsp Vanilla Bean Powder
½ tsp Vanilla Extract
1 tsp Vanilla Stevia
¼ tsp Sea Salt

Jing It Up (options)

2 tsp Pearl Powder
1-2 TB Ghee
1 TB MCT Oil
1 TB Collagen Powder

Sling It Up

If you do not have a high performance blender simply process all of the ingredients in your food processor and then transfer it to your blender to blend until smooth. This recipe can be prepared with a food processor only, however the texture will not be the silky smooth Crème Brûlée we love to serve. 

This Crème Brûlée can be served in small ramekins topped with our JingSlinger Chocolate Sauce and chilled.  It can also be spooned into either one of our Pie Crusts, dressed with sliced fresh bananas or layered with berries and then crowned with Chocolate Whipped Cream and toasted coconut flakes for our
“Pie’s The Limit!”


BLUcidity

The SuperFoods in the BLUcidity Shot support a brilliant brain, beaming beauty, while banishing body aches with powerful primordial foods! This is the brain shot that we made live on Dave Asprey’s Bulletproof Podcast # 145

The PEA of the E3Live Brain On tickles your tongue and feeds your brain, boosting many important neurotransmitters. The collagen and pearl bolster your skin’s regeneration and luminosity, while the natural COX-2 inhibiting properties of the Blue Majik phycocyanin (blue pigment) concentrate banishing body aches. Lion’s mane mushroom is an immune powerhouse, and protects your nervous system in many unique ways. Enjoy BLUcidity as a daily tonic shot, or anytime you need extra brain power or creative thinking.

BLUcidity

Gather Up

1 cup (240ml) Coconut Milk
1 tsp - 1 TB MCT Oil
½ tsp E3Live Blue Majik Powder
½ tsp E3Live Brain On Powder
1 tsp Host Defense Lion's Mane (open up 4 capsules)
1/8 - ¼ tsp Vanilla Stevia (to taste)
1/8 - ¼ tsp Chocolate Stevia (to taste) 

Jing It Up (options)

1 TB Colostrum Powder
1 TB Collagen Powder
½ tsp Pearl Powder
¼ tsp Deer Antler Extract
½ tsp Vanilla Bean Powder

BLUcidity Ingredients

Sling It Up

Pour the coconut milk and MCT oil into a small bowl. Mix in the dry powders with a whisk or spoon until fully integrated into the coconut milk and MCT oil. It will be a beautiful shade of blue! Add your vanilla and chocolate stevia to taste. 

Coconut Ice Cubes

Coconut Ice Cubes

Gather Up

1½ cups (370ml, or 1 can) Coconut Milk
¼ tsp Vanilla Stevia

Sling It Up

Stir the coconut milk and stevia together in a Pyrex-type measuring cup, dissolving any lumps in the coconut milk. If using a silicone Tovolo ice cube tray (see photo on page 98) there will be exactly enough liquid to fill it up. If you have different ice cube trays, adjust accordingly, just know that this 1½ cup (370ml) of Coconut Ice Cube measure is what we will be working with for proportions when we make our JingLato. If you do well with dairy and have access to organic raw cream, then it will also work stellar for making ice cubes. 

When using Coconut Ice Cubes, once they are frozen solid, you will always want to let them sit at room temperature for about 10 minutes just before using them. This will allow them to soften just a bit. They will be much easier to pop out of their trays, and will have a little more give in the blender.

Heart Beet Rawvioli

Raw, Vegan and Paleo dinner in minutes without the oven or stovetop!! This ravioli pumps up your Nitric Oxide levels to support a healthy heart and circulation. Nobel Laureate in Medicine, Dr. Louis Ignarro explained that by boosting the nitric oxide levels our body we can prevent and even reverse heart disease. Beets are one of the top foods that deliver this protection. The “Pasta” is thinly sliced raw beet, with a 30-minute quick marinate in olive oil and spices. Choose your favorite filling and dinner is served.

Raw, Vegan and Paleo dinner in minutes without the oven or stovetop!! This ravioli pumps up your Nitric Oxide levels to support a healthy heart and circulation. Nobel Laureate in Medicine, Dr. Louis Ignarro explained that by boosting the nitric oxide levels our body we can prevent and even reverse heart disease. Beets are one of the top foods that deliver this protection. The “Pasta” is thinly sliced raw beet, with a 30-minute quick marinate in olive oil and spices. Choose your favorite filling and dinner is served.

Heart Beet Ravioli

Gather Up

(For Pasta)
2 large Raw Beets, peeled
¼ cup Olive Oil
¼ tsp Black Truffle Salt or Sea Salt
¼ tsp Garlic Granules
(for Pesto)
2 cups Fresh Basil Leaves, packed tight
¾ cups Pine Nuts or Pistachios, toasted
5 TB Extra Virgin Olive Oil
1 TB MCT Oil
½ tsp Sea Salt or Black Truffle Salt
¼ tsp Fresh Ground Black Pepper
1 tsp Maca Powder
1 tsp Lemon Juice 

Almond Cheese Filling

1 cup (227g) Kite Hill Almond Ricotta Cheese or Homemade Nut Cheese Option*
2 cups (200g) Pine Nuts, soaked
3 TB Nutritional Yeast
2 TB Lemon Juice
¼ tsp Garlic Granules
½ tsp Sea Salt
¼ tsp Fresh Ground Black Pepper
4-6 TB (90ml) Coconut Milk
Probiotic Powder, from 3 opened capsules

Sling It Up (options)

Peel the beet and slice on the thinnest setting of your mandoline. Using a heart-shaped cookie cutter, cut each beet slice by simply pressing down on the slice, one at a time, with the sharp edge of the cookie cutter. Toss the beet hearts in the olive oil and spices in a small bowl and allow to marinate in the refrigerator for at least 30 minutes, the longer the more tender.

Place all the pesto ingredients into your food processor and pulse adding the olive oil, one tablespoon at a time, until the pesto comes together, and set aside.

If you choose to buy the Kite Hill Almond Ricotta, just mix in a bowl with a splash of coconut milk, salt, pepper and garlic granules (to taste) until a thick spreadable cheese forms.

*If you choose to do the homemade recipe- Soak the pine nuts for 1-hour, then discard the soak water. Place all prepared ingredients into your clean food processor except the coconut milk, and pulse while adding the milk one tablespoon at a time until a thick spreadable cheese forms. Taste and tweak spices as you wish.

Assembly and Serving: Place one heart-shaped beet on the plate, put a dollop of nut cheese, (a dollop of Gratitouille filling is optional but awesome here) and place the top heart-shaped beet over the fillings. Arrange the stuffed hearts on the serving plate and dress with the Pesto and Goji Balsamic. Garnish with spiralized carrots, beets and zucchini. These make great party appetizers too!

I Love You Latte

Now the Coffee you Love, can Love you back! We use Bulletproof Coffee as the base for this Latte. It insures an upgraded coffee experience from their uber clean beans.  Coffee is an excellent potentiator for deep delivery of important macronutrients and tonic herbs. We love balancing the natural caffeine bump in our latte with herbs that support your adrenals, and healthy fats that support your hormones and brain function. 

I Love You Latte

Our preferred method for brewing coffee is the French Press method. From start to finish, it takes less then five minutes! 

Jing It Up

1 tsp Restore the Jing
1 tsp Pearl Powder
1 TB Maca Powder
1 tsp - 1 TB MCT Oil

Gather Up

2 cups (500ml) brewed Coffee
2 TB Cacao Powder
1 TB Sunflower Lecithin Powder
2 TB Collagen Powder (Paleo Option)
2 TB Ghee or SuperFood Shortening
½ tsp KAL brand Hazelnut Stevia
½ tsp Vanilla Creme Stevia
½ tsp Chocolate Stevia
¼ cup (60ml) Coconut Milk 

Sling It Up

Place all ingredients in your blender. Cover with a towel and hold the lid down tightly, allowing the vents to still breathe and blend starting on the lowest setting, gradually ramping it up to a high speed and blending well, for 30 seconds. 

I Love You Berry Much

This strawberry ice cream is just as good as the one you had growing up, but carries more nutrition in its back pocket then most five star meals. Its fresh farm-to-table real strawberry flavor will take you back to the tire swing in your nana’s backyard, delightfully lapping up a cone full of this homemade magic. Ice cream loves its natural match, as pictured here canoodling with our signature Chocolate Cake and wrapped in our Coconut Whipped Cream.

Raise the vibration of this libation with Rose Water, which opens your heart and brightens your spirit. Did you know that Strawberries are part of the Rose family? It makes them a perfect pairing. 

I Love You Berry Much

Gather Up

1½ cups (130g) Frozen Strawberries
1/3 tray (130g) Coconut Ice Cubes
¼ cup (60ml) Coconut Milk
1 TB Xylitol Powder
¼ tsp Vanilla Stevia
Fresh Strawberries (optional garnish)
Chocolate Covered Hemp Seeds (optional garnish)

Jing It Up (options)

1 TB MCT Oil
1 tsp Pearl Powder
½ tsp Rose Water
½ TB Arnox Advantage
½ TB Miracle Reds
2 TB Collagen Powder, Whey Protein or Vanilla Vegan Protein 

Sling It Up

Place half of your frozen strawberries (¾ cup, 65g) in a medium-sized metal bowl and let them sit at room temperature for 10 minutes. Next, set your frozen Coconut Ice Cubes and the second half of your frozen strawberries on the counter. Let them sit for 10 minutes to slightly soften, allowing the strawberries in your metal bowl to continue softening. 

Next, mash the strawberries in the metal bowl with a large fork. Pour your coconut milk into your blender and add all of your ingredients, except for the mashed strawberries in the bowl, into your blender. Pound with your tamper, until thick and smooth. 

Spoon your JingLato out of the blender and pour into the bowl. Mix well with the mashed strawberries. 

Garnish with additional fresh strawberries and chocolate covered hemp seeds.  

I Love You Berry Much